摘要
本周计划学习目标检测四种网络类型,从原始的R-CNN、到SPP-NET到Fast R-CNN、Faster R-CNN,网络之间的进化史以及改进 的部分。运行一个目标检测的代码。学习甲状腺评分的论文,了解甲状腺评分规则以及现有的评分类论文。毕设目前完成了开题报告和ppt。
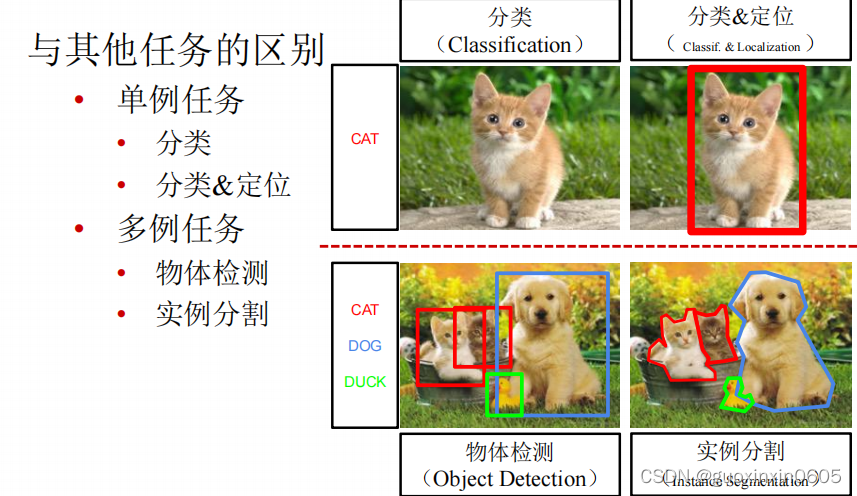
一、目标检测
目标检测就是检测出图片中所有物体的类别标签和位置,就是可以在物体的周围画出一个框,下面从原始的目标检测模型开始讲起。
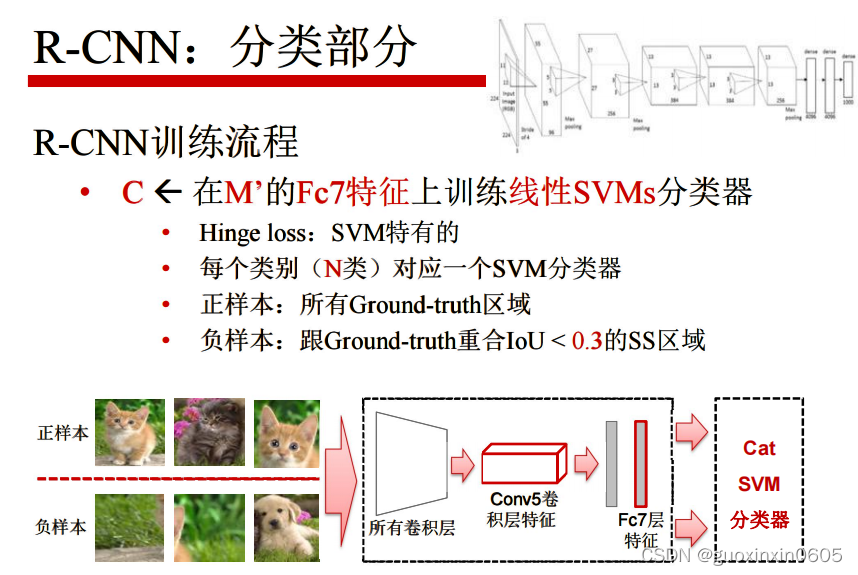
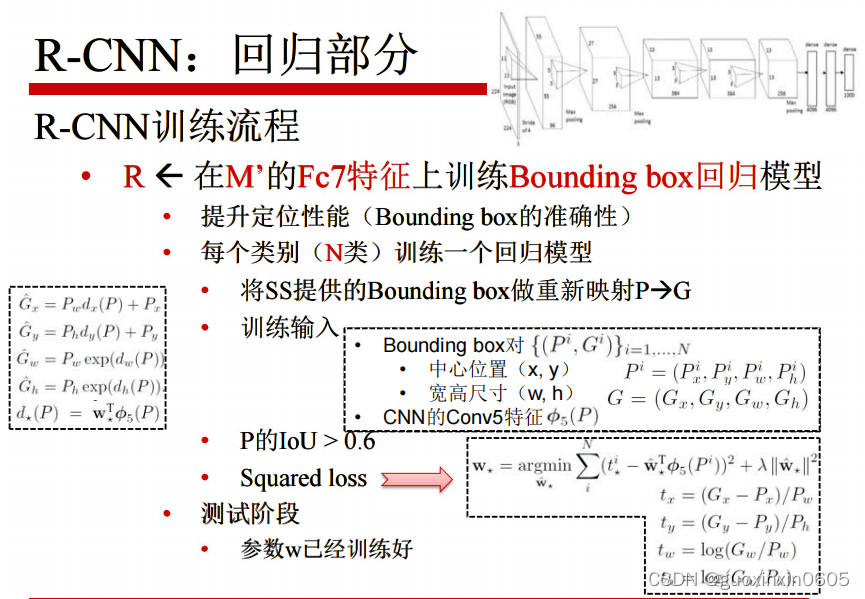
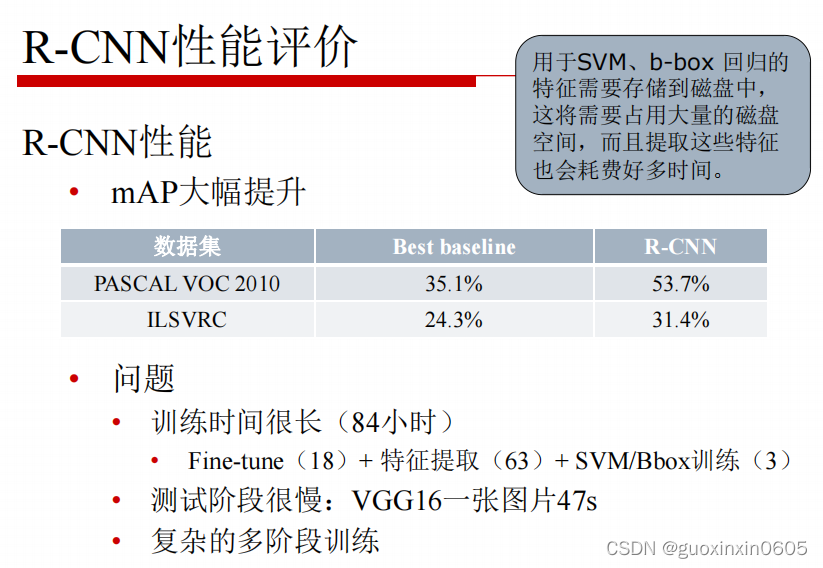
1.1 区域卷积神经网络R-CNN
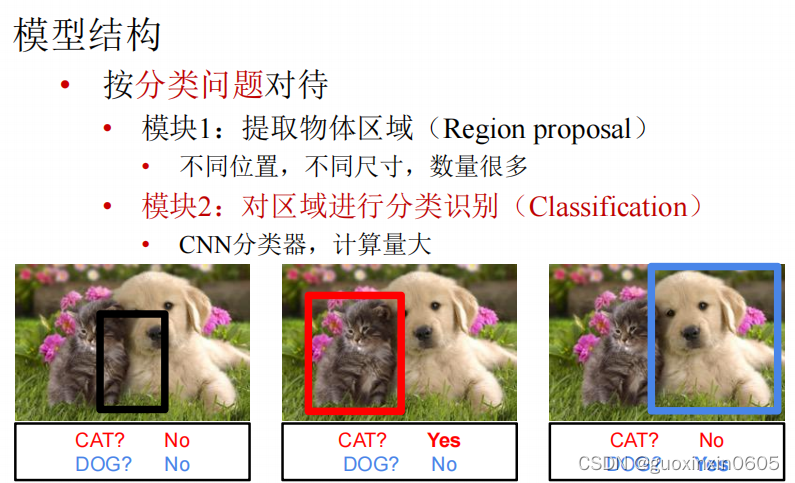
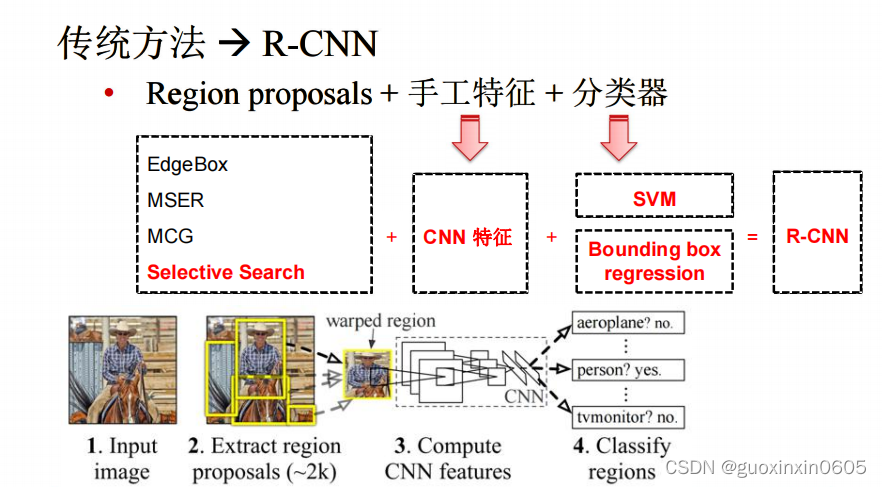
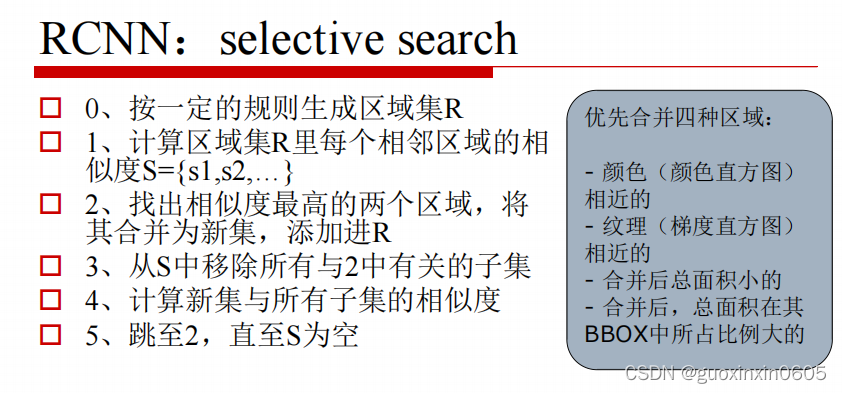
这一步是在一副图中选出大约2000个可能有物体存在的框,选择的标准按照以下步骤进行。
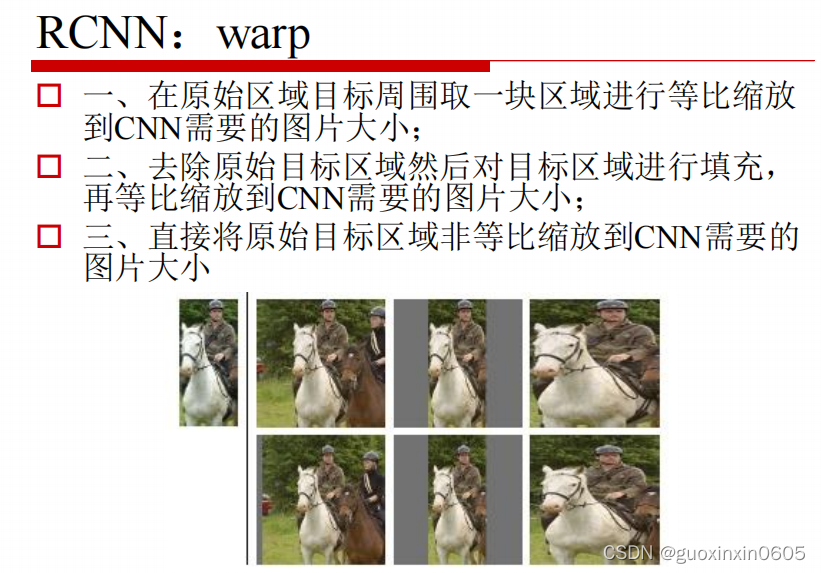
在我们选出候选框之后,这些候选框大小不一,而我们的cnn网络要求输入的都是统一尺寸大小的,,那么就要经过warp这一个步骤将候选框变成尺寸统一。
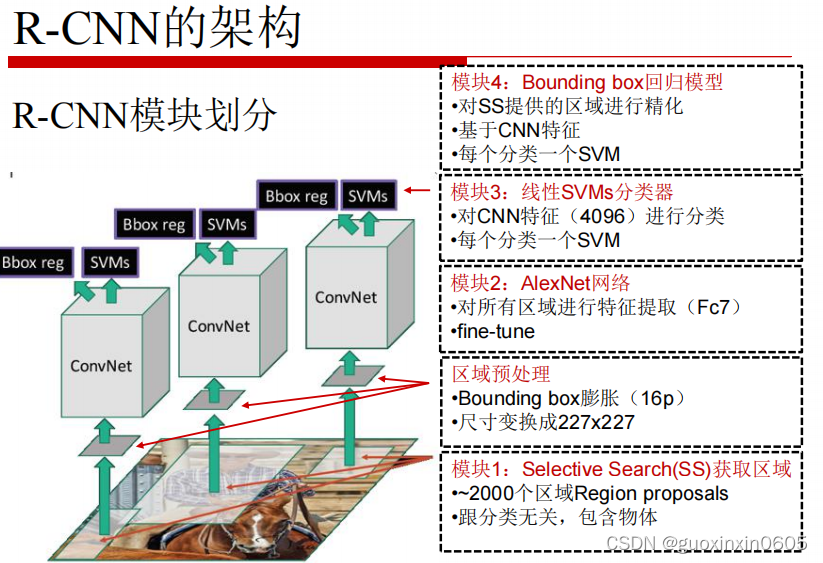
那么R-CNN是怎么训练的呢?
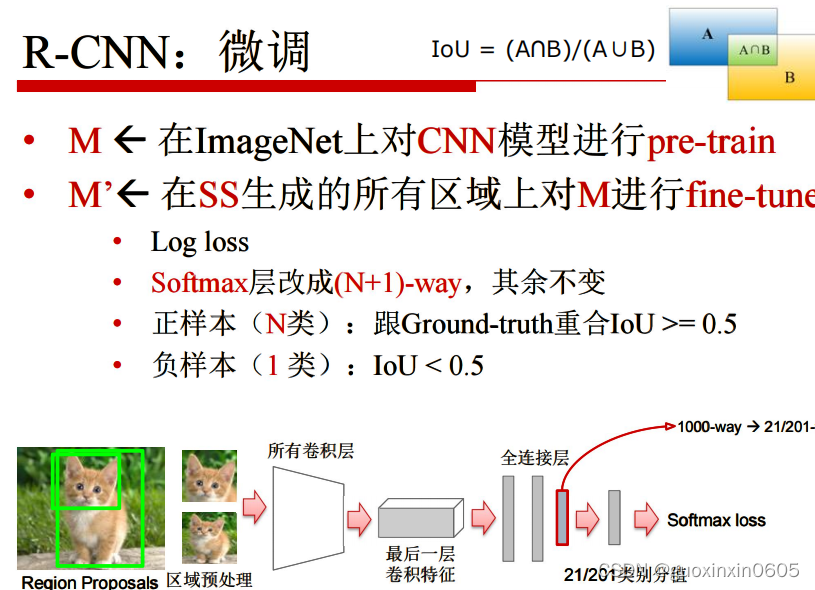
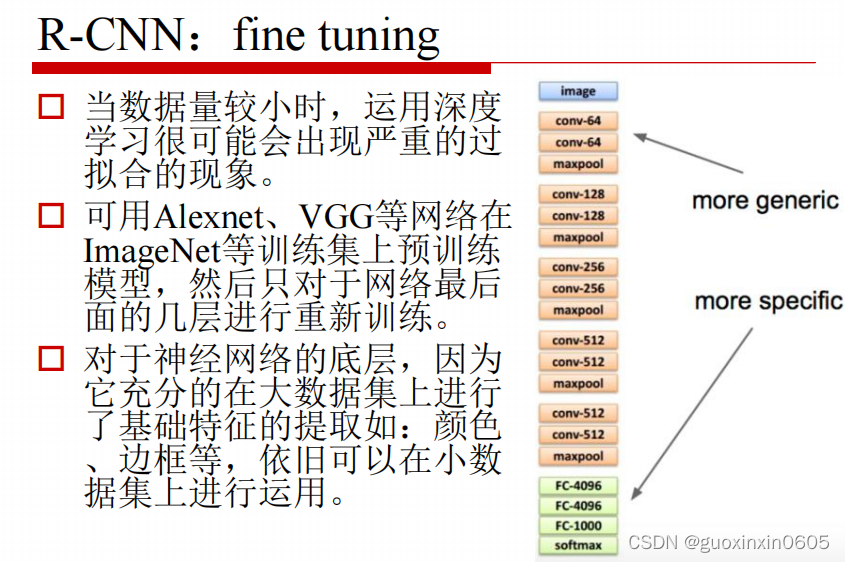
还是按照之前讲过的fine tuning的算法,训练后面的全连接层。

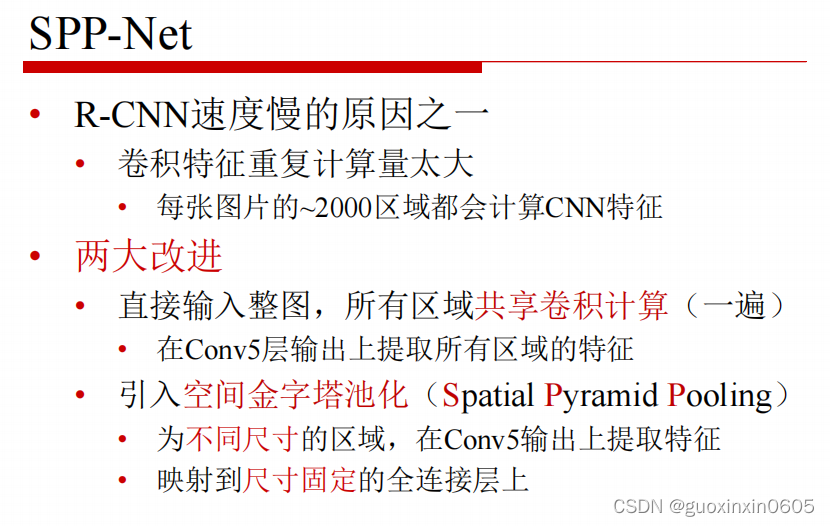
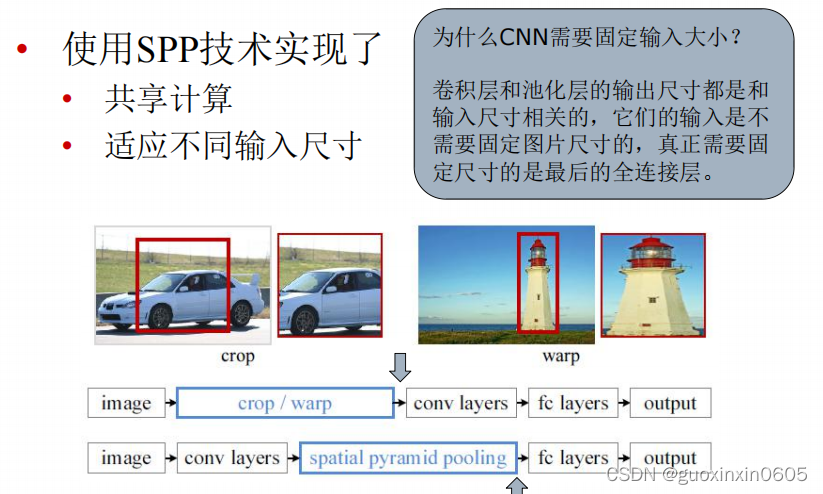
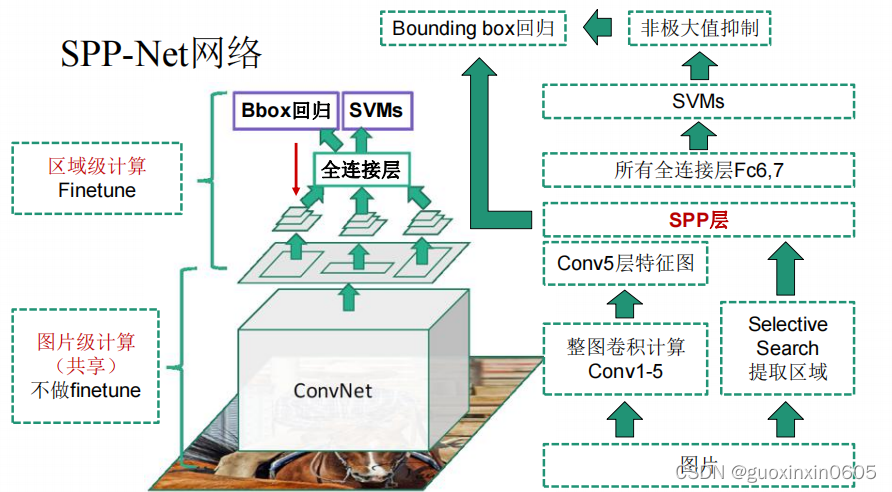
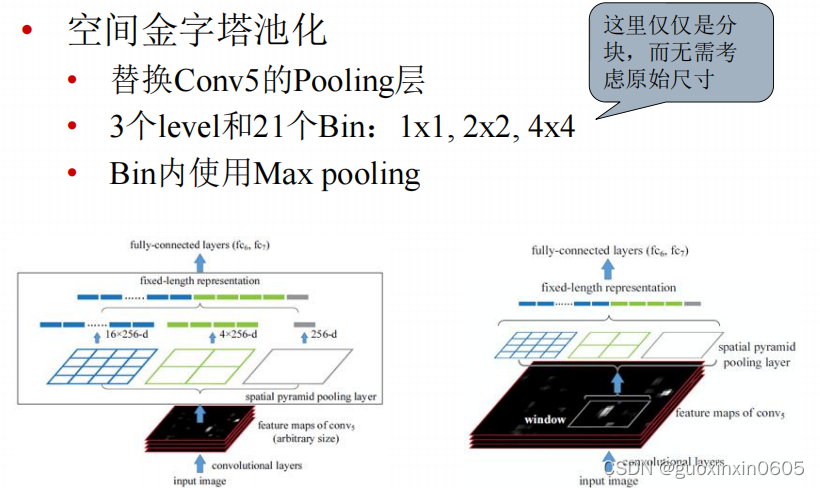
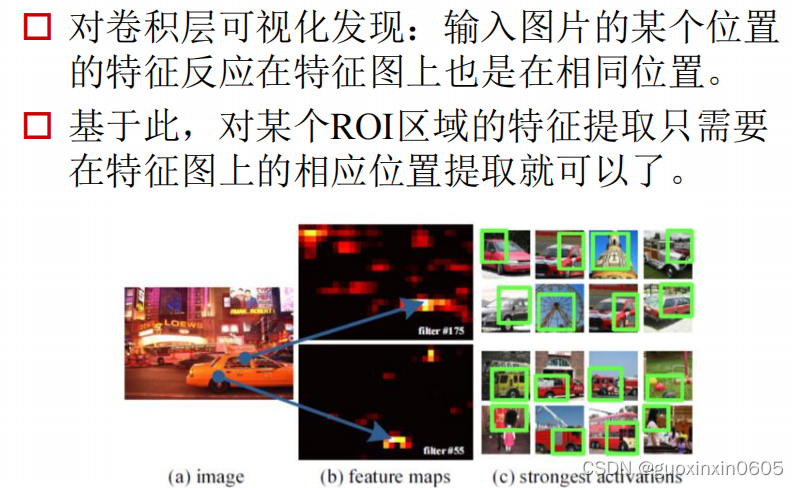
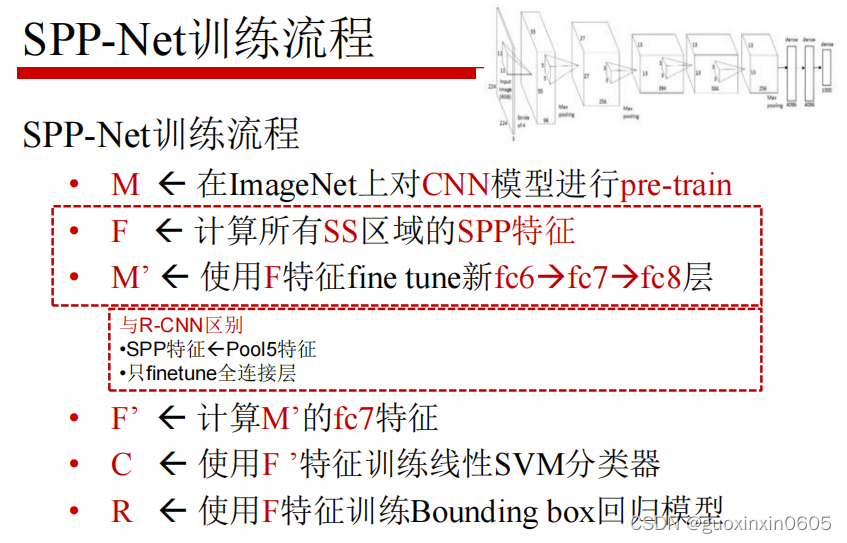
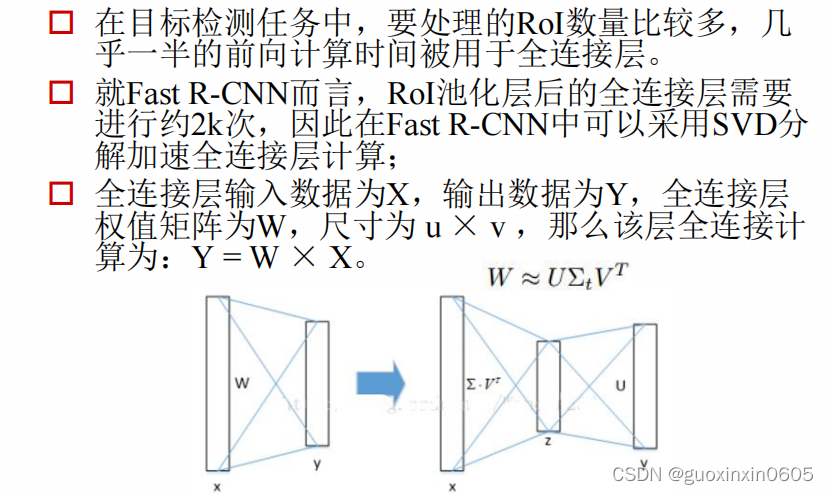
1.2 SPP-NET
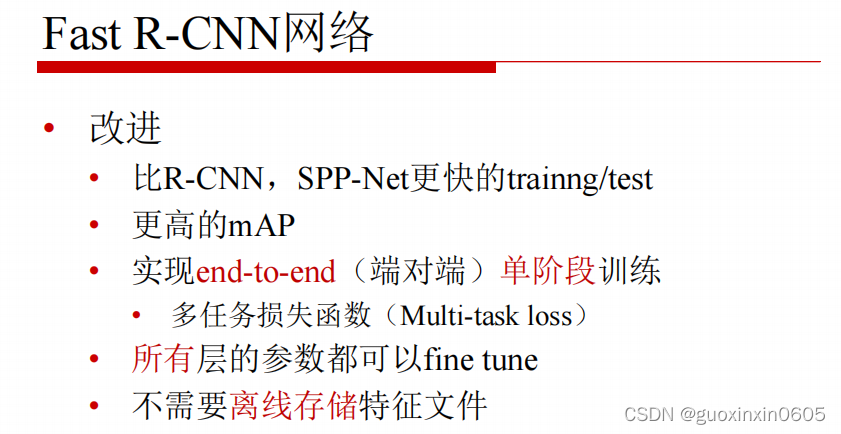
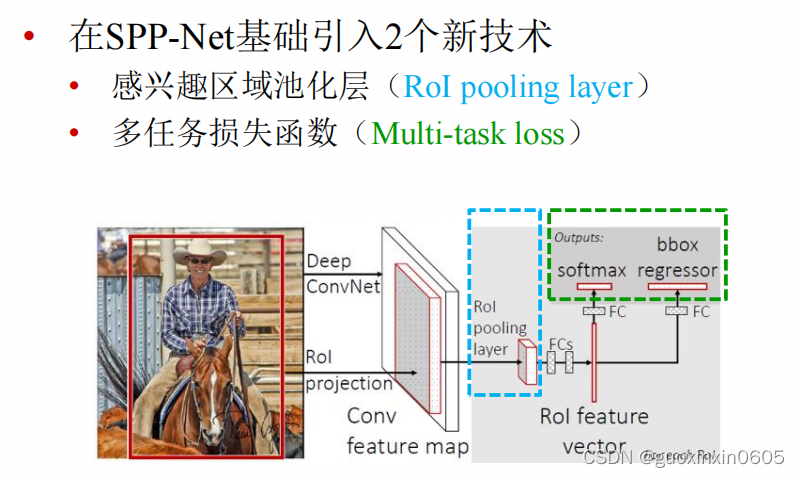
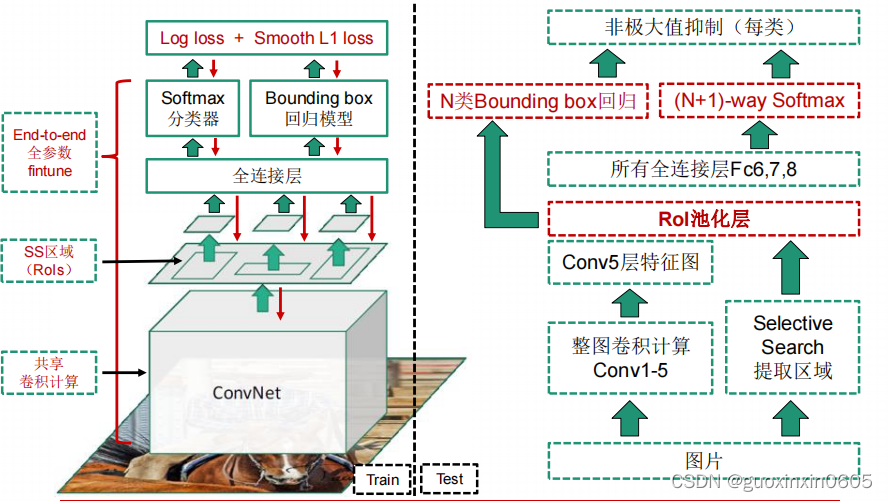
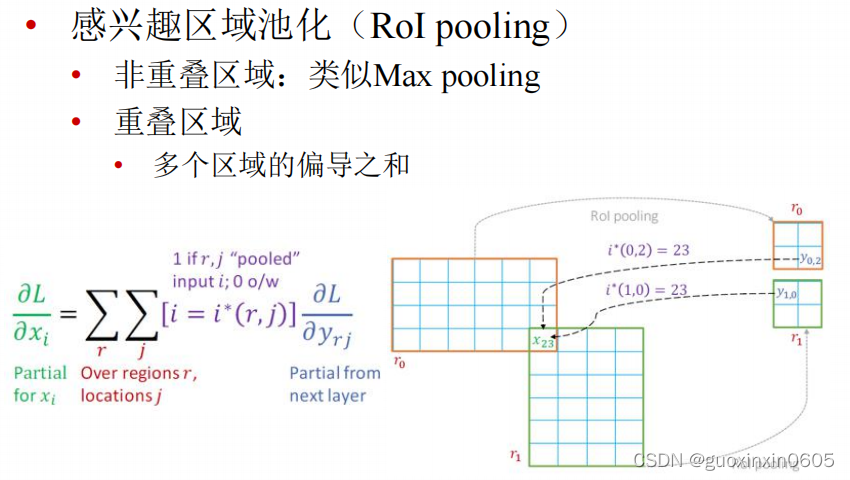
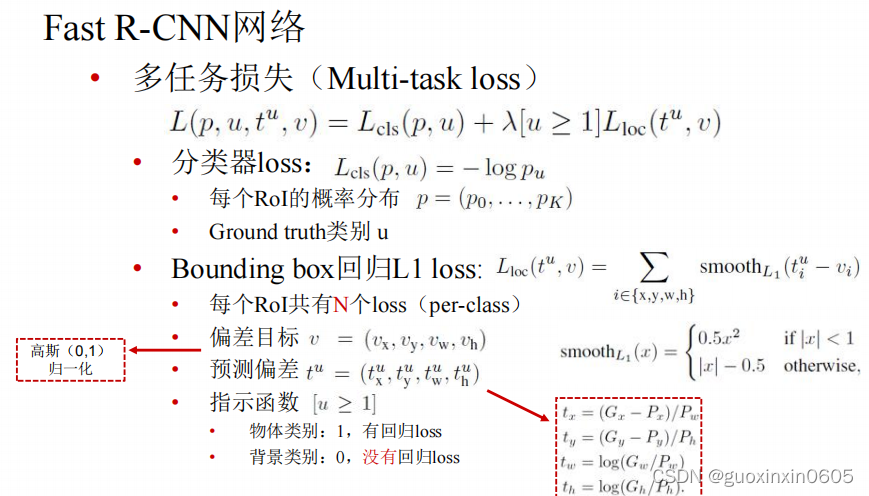
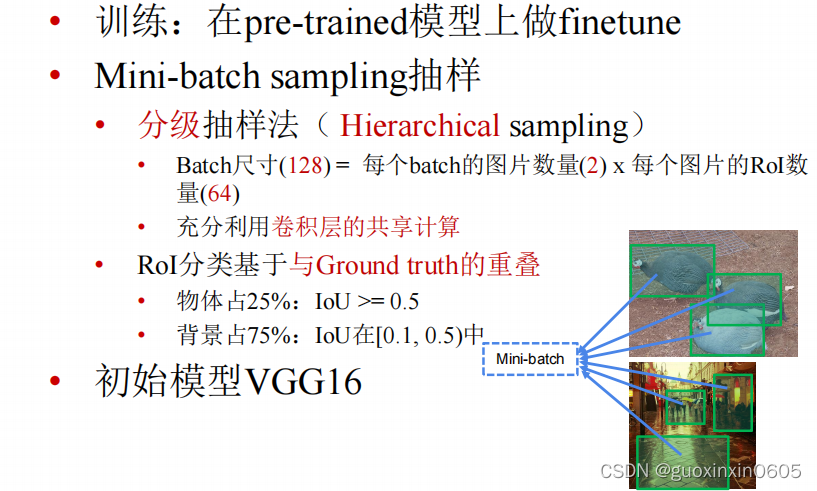
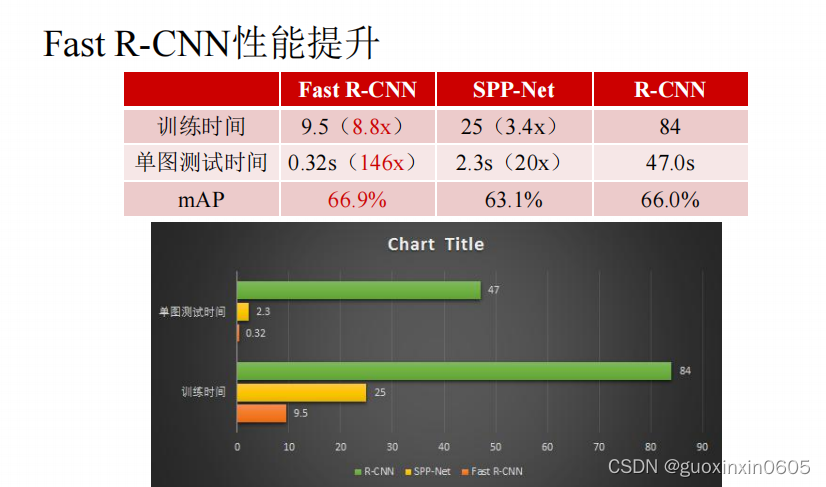
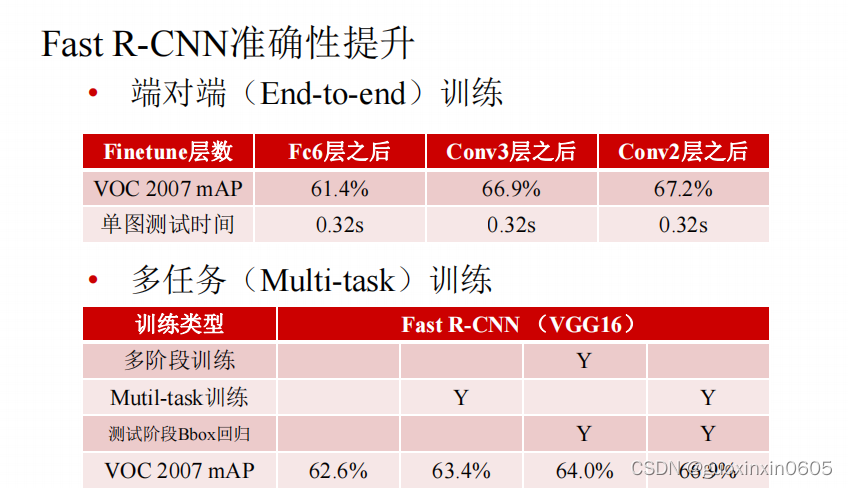
1.3 Fast R-CNN
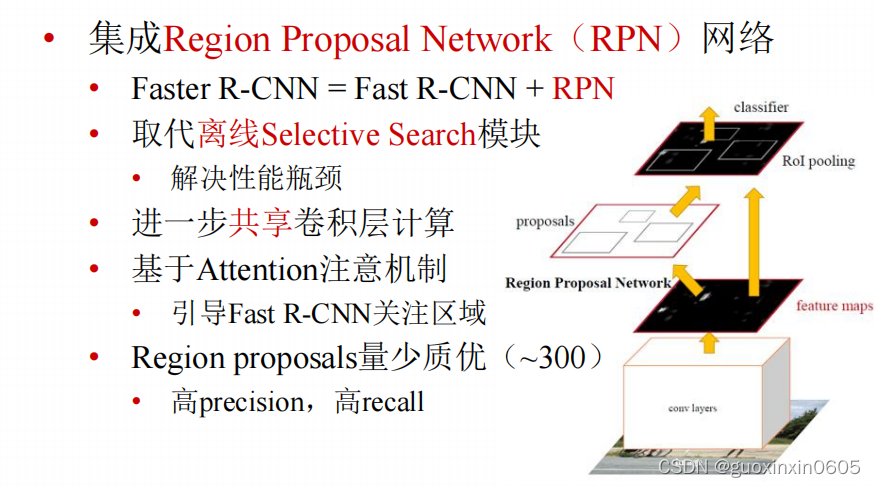
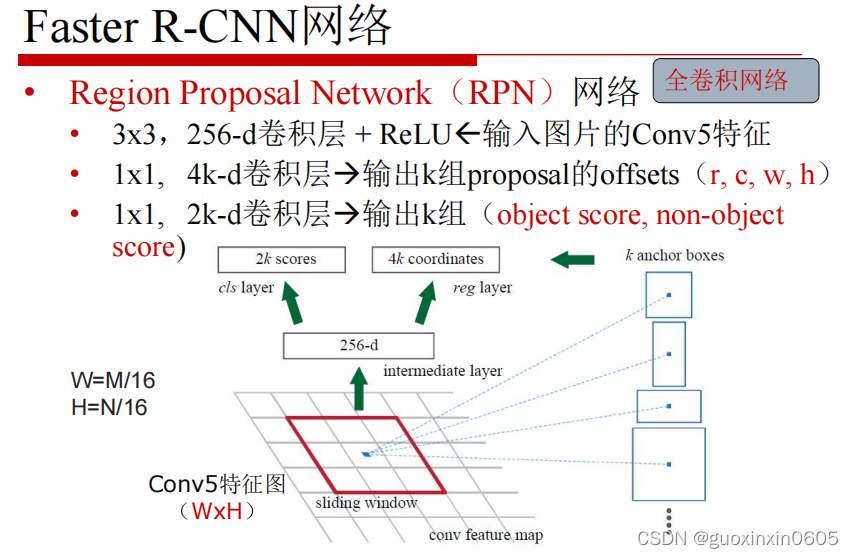
1.4 Faster R-CNN
Faster R-CNN的想法是既然其他的模块全部都是卷积神经网络,那么不如把SS模块也变成卷积神经网络。

二、代码
这是目标检测的测试代码,代码的功能是输入一张图片,会自己框住一些物体并且输出对物体的判断以及概率。
import os
import cv2
import numpy as np
import sys
import pickle
from optparse import OptionParser
import time

import keras
from keras_frcnn import config
import keras_frcnn.resnet as nn
from keras import backend as K
from keras.layers import Input
from keras.models import Model
from keras_frcnn import roi_helpers

sys.setrecursionlimit(40000)

parser = OptionParser()

parser.add_option("-p", "--path", dest="test_path", help="Path to test data.", default='data/test/')
parser.add_option("-n", "--num_rois", dest="num_rois", help="Number of ROIs per iteration. Higher means more memory use.", default=32)
parser.add_option("--config_filename", dest="config_filename", help= "Location to read the metadata related to the training (generated when training).", default="config/config.pickle")

(options, args) = parser.parse_args()

if not options.test_path:   # if filename is not given
    parser.error('Error: path to test data must be specified. Pass --path to command line')


config_output_filename = options.config_filename

with open(config_output_filename, 'rb') as f_in:
    C = pickle.load(f_in)

# turn off any data augmentation at test time
C.use_horizontal_flips = False
C.use_vertical_flips = False
C.rot_90 = False

img_path = options.test_path


def format_img(img, C):
    img_min_side = float(C.im_size)
    (height,width,_) = img.shape

    if width <= height:
        f = img_min_side/width
        new_height = int(f * height)
        new_width = int(img_min_side)
    else:
        f = img_min_side/height
        new_width = int(f * width)
        new_height = int(img_min_side)
    img = cv2.resize(img, (new_width, new_height), interpolation=cv2.INTER_CUBIC)
    img = img[:, :, (2, 1, 0)]
    img = img.astype(np.float32)
    img[:, :, 0] -= C.img_channel_mean[0]
    img[:, :, 1] -= C.img_channel_mean[1]
    img[:, :, 2] -= C.img_channel_mean[2]
    img /= C.img_scaling_factor
    img = np.transpose(img, (2, 0, 1))
    img = np.expand_dims(img, axis=0)
    return img


class_mapping = C.class_mapping

if 'bg' not in class_mapping:
    class_mapping['bg'] = len(class_mapping)

class_mapping = {v: k for k, v in class_mapping.items()}
print(class_mapping)
class_to_color = {class_mapping[v]: np.random.randint(0, 255, 3) for v in class_mapping}
C.num_rois = int(options.num_rois)

if K.image_dim_ordering() == 'th':
    input_shape_img = (3, None, None)
    input_shape_features = (1024, None, None)
else:
    input_shape_img = (None, None, 3)
    input_shape_features = (None, None, 1024)


img_input = Input(shape=input_shape_img)
roi_input = Input(shape=(C.num_rois, 4))
feature_map_input = Input(shape=input_shape_features)

# define the base network (resnet here, can be VGG, Inception, etc)
shared_layers = nn.nn_base(img_input, trainable=True)

# define the RPN, built on the base layers
num_anchors = len(C.anchor_box_scales) * len(C.anchor_box_ratios)
rpn_layers = nn.rpn(shared_layers, num_anchors)

classifier = nn.classifier(feature_map_input, roi_input, C.num_rois, nb_classes=len(class_mapping), trainable=True)

model_rpn = Model(img_input, rpn_layers)
model_classifier_only = Model([feature_map_input, roi_input], classifier)

model_classifier = Model([feature_map_input, roi_input], classifier)

model_rpn.load_weights(C.model_path, by_name=True)
model_classifier.load_weights(C.model_path, by_name=True)

model_rpn.compile(optimizer='sgd', loss='mse')
model_classifier.compile(optimizer='sgd', loss='mse')

all_imgs = []

classes = {}

bbox_threshold = 0.8

visualise = True

for idx, img_name in enumerate(sorted(os.listdir(img_path))):
    if not img_name.lower().endswith(('.bmp', '.jpeg', '.jpg', '.png', '.tif', '.tiff')):
        continue
    print(img_name)
    st = time.time()
    filepath = os.path.join(img_path,img_name)

    img = cv2.imread(filepath)

    X = format_img(img, C)

    img_scaled = np.transpose(X.copy()[0, (2, 1, 0), :, :], (1, 2, 0)).copy()
    img_scaled[:, :, 0] += 123.68
    img_scaled[:, :, 1] += 116.779
    img_scaled[:, :, 2] += 103.939

    img_scaled = img_scaled.astype(np.uint8)

    if K.image_dim_ordering() == 'tf':
        X = np.transpose(X, (0, 2, 3, 1))

    # get the feature maps and output from the RPN
    [Y1, Y2, F] = model_rpn.predict(X)


    R = roi_helpers.rpn_to_roi(Y1, Y2, C, K.image_dim_ordering(), overlap_thresh=0.7)

    # convert from (x1,y1,x2,y2) to (x,y,w,h)
    R[:, 2] -= R[:, 0]
    R[:, 3] -= R[:, 1]

    # apply the spatial pyramid pooling to the proposed regions
    bboxes = {}
    probs = {}

    for jk in range(R.shape[0]//C.num_rois + 1):
        ROIs = np.expand_dims(R[C.num_rois*jk:C.num_rois*(jk+1), :], axis=0)
        if ROIs.shape[1] == 0:
            break

        if jk == R.shape[0]//C.num_rois:
            #pad R
            curr_shape = ROIs.shape
            target_shape = (curr_shape[0],C.num_rois,curr_shape[2])
            ROIs_padded = np.zeros(target_shape).astype(ROIs.dtype)
            ROIs_padded[:, :curr_shape[1], :] = ROIs
            ROIs_padded[0, curr_shape[1]:, :] = ROIs[0, 0, :]
            ROIs = ROIs_padded

        [P_cls, P_regr] = model_classifier_only.predict([F, ROIs])

        for ii in range(P_cls.shape[1]):

            if np.max(P_cls[0, ii, :]) < bbox_threshold or np.argmax(P_cls[0, ii, :]) == (P_cls.shape[2] - 1):
                continue

            cls_name = class_mapping[np.argmax(P_cls[0, ii, :])]

            if cls_name not in bboxes:
                bboxes[cls_name] = []
                probs[cls_name] = []

            (x, y, w, h) = ROIs[0, ii, :]

            cls_num = np.argmax(P_cls[0, ii, :])
            try:
                (tx, ty, tw, th) = P_regr[0, ii, 4*cls_num:4*(cls_num+1)]
                tx /= C.classifier_regr_std[0]
                ty /= C.classifier_regr_std[1]
                tw /= C.classifier_regr_std[2]
                th /= C.classifier_regr_std[3]
                x, y, w, h = roi_helpers.apply_regr(x, y, w, h, tx, ty, tw, th)
            except:
                pass
            bboxes[cls_name].append([16*x, 16*y, 16*(x+w), 16*(y+h)])
            probs[cls_name].append(np.max(P_cls[0, ii, :]))

    all_dets = []

    for key in bboxes:
        bbox = np.array(bboxes[key])

        new_boxes, new_probs = roi_helpers.non_max_suppression_fast(bbox, np.array(probs[key]), overlap_thresh=0.5)

        for jk in range(new_boxes.shape[0]):
            (x1, y1, x2, y2) = new_boxes[jk,:]

            color = class_to_color[key]
            print(color[0])
            cv2.rectangle(img_scaled,(x1, y1), (x2, y2), (int(color[0]),int(color[1]),int(color[2])),2)

            textLabel = '{}: {}'.format(key,int(100*new_probs[jk]))
            all_dets.append((key,100*new_probs[jk]))

            (retval,baseLine) = cv2.getTextSize(textLabel,cv2.FONT_HERSHEY_COMPLEX,1,1)
            textOrg = (x1, y1-0)

            cv2.rectangle(img_scaled, (textOrg[0] - 5, textOrg[1]+baseLine - 5), (textOrg[0]+retval[0] + 5, textOrg[1]-retval[1] - 5), (0, 0, 0), 2)
            cv2.rectangle(img_scaled, (textOrg[0] - 5,textOrg[1]+baseLine - 5), (textOrg[0]+retval[0] + 5, textOrg[1]-retval[1] - 5), (255, 255, 255), -1)
            cv2.putText(img_scaled, textLabel, textOrg, cv2.FONT_HERSHEY_DUPLEX, 1, (0, 0, 0), 1)
    print('Elapsed time = {}'.format(time.time() - st))
    cv2.imshow('img', img_scaled)
    cv2.waitKey(0)
    #cv2.imwrite('./imgs/{}.png'.format(idx),img_scaled)
    print(all_dets)
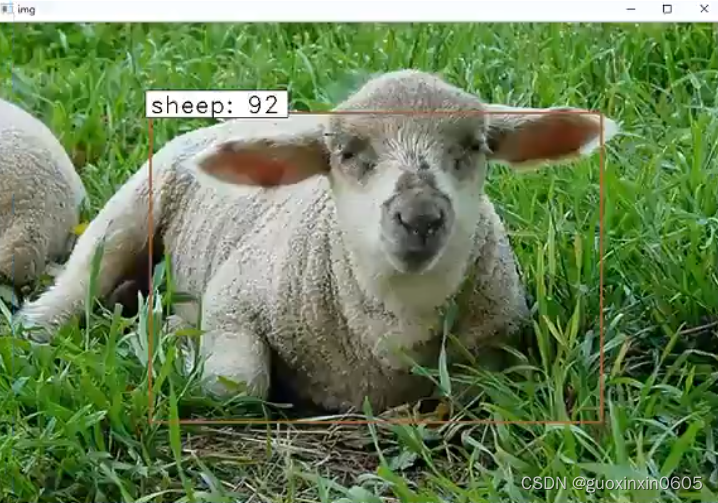
这是运行的结果,可以认出是绵羊。
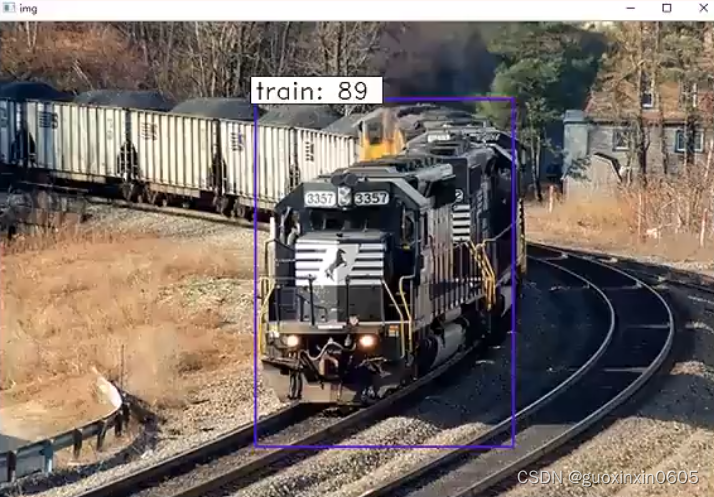
识别出火车
总结
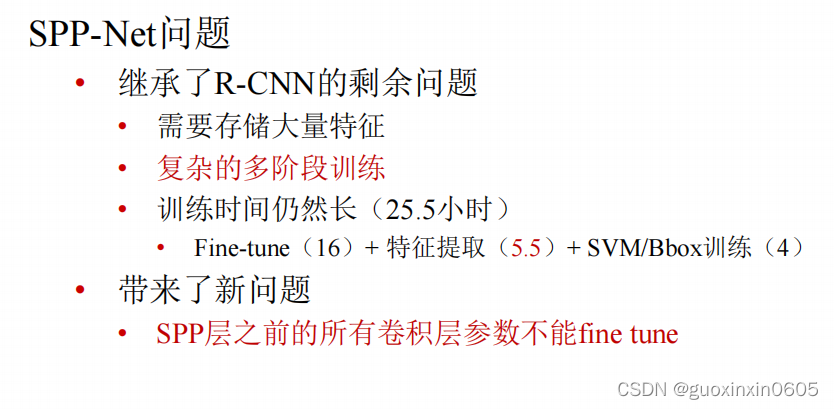
本周完成了目标检测的学习,目标检测就是输入一张图片可以识别出图片中的物体的类别以及标记出物体的位置。文章从原始的目标识别算法R-CNN讲起,R-CNN是先用SS获取候选区域,对候选区域进行区域处理使其尺寸统一,将尺寸统一的候选区域放入Alexnet网络中特征提取结果得到一个SVMs分类和一个Bbox回归模型,但是它存在问题是重复卷积计算量太大,时间开销太久,所以提出了改进模型SPP-NET,改进的地方是,先对整张图片进行卷积操作,所有的区域共享卷积,这样就计算一遍卷积,并且引入了空间金字塔池化,为不同尺寸的区域,在conv5输出上提取特征,映射到尺寸固定的全连接层上,它可以实现共享计算,并且适应不同尺寸的数入,但是这个网络也不能很好的解决训练时间过长的问题,并且还带来了新的问题,它限制了spp层之前的所有卷积层不能fine-tuning。然后有了Fast R-CNN网络,它实现了端到端的单阶段训练,引入了两个新的技术,一个是感兴趣区域池化层,一个是多任务损失函数。既然在这个网络中除了ss区域其他全部是卷积网络,索性再改进一下,变成Faster R-CNN,这个网络中把ss模块也变成了卷积网络。
版权声明:本文为CSDN博主「guoxinxin0605」的原创文章,遵循CC 4.0 BY-SA版权协议,转载请附上原文出处链接及本声明。
原文链接:https://blog.csdn.net/guoxinxin0605/article/details/121892822


