下载项目:https://github.com/ultralytics/yolov5
1.硬件配置:
CPU:Intel Xeon Gold 6146 3.2GHz
GPU:GTX3090*4
2.1.运行环境:先安装torch+cu110、torchvision==0.8.2+cu110 torchaudio=0.7.2(cuda11.1与torch1.7.1版本不兼容)
pip install torch===1.7.1+cu110 torchvision===0.8.2+cu110 torchaudio===0.7.2 -f https://download.pytorch.org/whl/torch_stable.html
然后安装依赖
pip install -r requirements.txt
可能会遇到error:… thop …直接 pip install thop -i https://pypi.douban.com/simple 升级版本
2.2.数据集标注
下载好数据集后,使用labelimg软件对数据集进行标注
Labelimg软件下载:
打开anaconda prompt
依次输入以下命令
pip install PyQt5 -i https://pypi.tuna.tsinghua.edu.cn/simple/(后面这行是国内的清华镜像源,下载速度才会比较快)()
pip install pyqt5-tools -i https://pypi.tuna.tsinghua.edu.cn/simple/
pip install lxml -i https://pypi.tuna.tsinghua.edu.cn/simple/
pip install labelImg -i https://pypi.tuna.tsinghua.edu.cn/simple/ (Img中的I要大写,注意)
输入labelImg打开软件:


导入数据集
点击Open Dir导入文件

点击Create RectBox进行标注


标注完成后进行保存,每张图片对应一个xml文件,里面包含一系列图片信息,如图片路径、图片名称、目标坐标、目标类别等

3.增加或者修改项目文件:
• 在YOLO项目文件中新建文件夹用来存放训练图片等(如fish)
D:~~\yolov5\fish
• 在fish文件夹下新建四个文件夹并添加test.py和voc_labels.py
• images、labels下新建train2017文件夹,原来存放图片和标注信息

• test.py
import os
import random

trainval_percent = 0.9  # 训练和验证集所占比例,剩下的0.1就是测试集的比例
train_percent = 0.8  # 训练集所占比例,可自己进行调整
xmlfilepath = 'Annotations'
txtsavepath = 'ImageSets\Main'
total_xml = os.listdir(xmlfilepath)

num = len(total_xml)
list = range(num)
tv = int(num * trainval_percent)
tr = int(tv * train_percent)
trainval = random.sample(list, tv)
train = random.sample(trainval, tr)

ftrainval = open('ImageSets/Main/trainval.txt', 'w')
ftest = open('ImageSets/Main/test.txt', 'w')
ftrain = open('ImageSets/Main/train.txt', 'w')
fval = open('ImageSets/Main/val.txt', 'w')

for i in list:
    name = total_xml[i][:-4] + '\n'
    if i in trainval:
        ftrainval.write(name)
        if i in train:
            ftrain.write(name)
        else:
            fval.write(name)
    else:
        ftest.write(name)

ftrainval.close()
ftrain.close()
fval.close()
ftest.close()
• voc_labels.py
# -*- coding: utf-8 -*-
import xml.etree.ElementTree as ET
import os
from os import getcwd
sets = ['train', 'val', 'test']
classes = ['fish'] #类型按项目要求写可以填多个
abs_path = os.getcwd()
def convert(size, box):
    dw = 1. / (size[0])
    dh = 1. / (size[1])
    x = (box[0] + box[1]) / 2.0 - 1
    y = (box[2] + box[3]) / 2.0 - 1
    w = box[1] - box[0]
    h = box[3] - box[2]
    x = x * dw
    w = w * dw
    y = y * dh
    h = h * dh
    return x, y, w, h

def convert_annotation(image_id):
    in_file = open('Annotations/%s.xml' % (image_id), encoding='utf-8', errors='ignore')
    out_file = open('labels/%s.txt' % (image_id), 'w')
    tree = ET.parse(in_file)
    root = tree.getroot()
    size = root.find('size')
    w = int(size.find('width').text)
    h = int(size.find('height').text)
    for obj in root.iter('object'):
        difficult = obj.find('difficult').text
        cls = obj.find('name').text
        if cls not in classes or int(difficult) == 1:
            continue
        cls_id = classes.index(cls)
        xmlbox = obj.find('bndbox')
        b = (float(xmlbox.find('xmin').text), float(xmlbox.find('xmax').text), float(xmlbox.find('ymin').text),
             float(xmlbox.find('ymax').text))
        b1, b2, b3, b4 = b
        # 标注越界修正
        if b2 > w:
            b2 = w
        if b4 > h:
            b4 = h
        b = (b1, b2, b3, b4)
        bb = convert((w, h), b)
        out_file.write(str(cls_id) + " " + " ".join([str(a) for a in bb]) + '\n')

wd = getcwd()
for image_set in sets:
    if not os.path.exists('labels/'):
        os.makedirs('labels/')
    image_ids = open('ImageSets/Main/%s.txt' % (image_set)).read().strip().split()
    list_file = open('%s.txt' % (image_set), 'w')
    for image_id in image_ids:
        list_file.write(abs_path + '/images/%s.jpg\n' % (image_id))
        convert_annotation(image_id)
    list_file.close()
• Annotations是存放图像标注文件.XML,文件名最好设为数字。(标注工具labelimg)

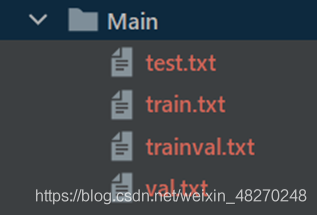
• ImageSets:在此文件夹新建两个文件夹Main和Layout

- 运行test.py 生成txt文件,并存放在Main里面。
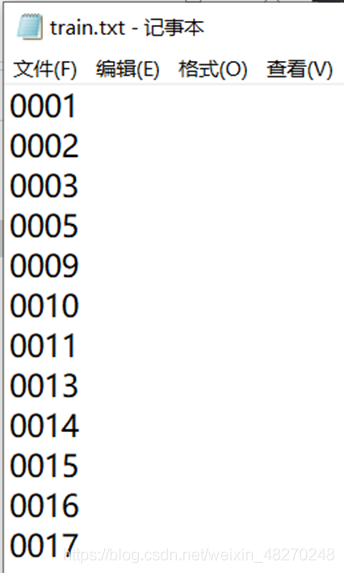
– 运行voc_labels.py 提取标注文件信息( xmin xmax ymin ymax),会在labels文件里生成txt文档。同时也会在当前目录生成test、train、val的路径文档。


– 在YOLOv5项目的data文件里新建.yaml文件。添加如下内容
 	# train and val data as 1) directory: path/images/, 2) file: path/images.txt, or 3) list: [path1/images/, path2/images/]
train: ./fish/images/train2017/ # 128 images
val: ./fish/images/train2017/
# number of classes
nc: 1
# class names
names: [ 'fish' ]
– 修改模型参数,models目录下的yolov5s.yaml(用其他模型也可以)只需要改nc

• 修改train.py

选择好对应路径,epochs为迭代次数默认300,可根据要求调整。
• 运行train.py 训练完成后,网络权重参数保存在runs/train/exp_/weights文件夹中 ,其中last.pt为最后一次训练的权重,best.pt为在验证集中AP最高的权重
$ python train.py --data coco.yaml --cfg yolov5s.yaml --weights '' --batch-size 64
                                         yolov5m                                40
                                         yolov5l                                24
                                         yolov5x                                16

5.使用模型进行检测
使用命令运行detect.py:python detect.py --source 需要检测的图片路径 --weight 权重文件路径 --conf 置信度
例:python detect.py –-source ./data/images/fish.jpg --weights ./runs/train/exp14/weights/best.pt --conf 0.25
用摄像头 python . detect.py --source 0 --weights weights\yolov5s.pt
报错图像文件等找不到,将datasets.py的124行注释掉,绝对路径

下图为–source的几个可选参数

检测结果保存在runs/detect文件夹中

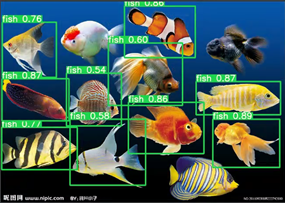
效果如下图所示,同时在终端显示检测到鱼的数量

6.使用自己的训练模型进行检测:
有了训练好的权重后,就可以就行目标检测测试了。直接在根目录的detect.py中进行调试,主要参数解释如下。我们平时用的话,主要用到的只有这几个参数而已:–weights,–source,–conf-thres,–project。
最后运行
python detect.py --source 0 --weights weights/best.pt
parser = argparse.ArgumentParser()
# 选用训练的权重,可用根目录下的yolov5s.pt,也可用runs/train/exp/weights/best.pt
parser.add_argument('--weights', nargs='+', type=str, default='yolov5s.pt', help='model.pt path(s)')
# 检测数据,可以是图片/视频路径,也可以是'0'(电脑自带摄像头),也可以是rtsp等视频流
parser.add_argument('--source', type=str, default='inference/videos/猫猫识别.mp4', help='source')  # file/folder, 0 for webcam
# 网络输入图片大小
parser.add_argument('--img-size', type=int, default=640, help='inference size (pixels)')
# 置信度阈值,检测到的对象属于特定类(狗,猫,香蕉,汽车等)的概率
parser.add_argument('--conf-thres', type=float, default=0.25, help='object confidence threshold')
# 做nms的iou阈值
parser.add_argument('--iou-thres', type=float, default=0.45, help='IOU threshold for NMS')
# 检测的设备,cpu;0(表示一个gpu设备cuda:0);0,1,2,3(多个gpu设备)。值为空时,训练时默认使用计算机自带的显卡或CPU
parser.add_argument('--device', default='', help='cuda device, i.e. 0 or 0,1,2,3 or cpu')
# 是否展示检测之后的图片/视频,默认False
parser.add_argument('--view-img', action='store_true', help='display results')
# 是否将检测的框坐标以txt文件形式保存,默认False
parser.add_argument('--save-txt', action='store_true', help='save results to *.txt')
# 是否将检测的labels以txt文件形式保存,默认False
parser.add_argument('--save-conf', action='store_true', help='save confidences in --save-txt labels')
# 设置只保留某一部分类别,如0或者0 2 3
parser.add_argument('--classes', nargs='+', type=int, help='filter by class: --class 0, or --class 0 2 3')
# 进行nms是否也去除不同类别之间的框,默认False
parser.add_argument('--agnostic-nms', action='store_true', help='class-agnostic NMS')
# 推理的时候进行多尺度,翻转等操作(TTA)推理
parser.add_argument('--augment', action='store_true', help='augmented inference')
# 如果为True,则对所有模型进行strip_optimizer操作,去除pt文件中的优化器等信息,默认为False
parser.add_argument('--update', action='store_true', help='update all models')
# 检测结果所存放的路径,默认为runs/detect
parser.add_argument('--project', default='runs/detect', help='save results to project/name')
# 检测结果所在文件夹的名称,默认为exp
parser.add_argument('--name', default='exp', help='save results to project/name')
# 若现有的project/name存在,则不进行递增
parser.add_argument('--exist-ok', action='store_true', help='existing project/name ok, do not increment')
opt = parser.parse_args()
版权声明:本文为CSDN博主「与秋逐鹿zz」的原创文章,遵循CC 4.0 BY-SA版权协议,转载请附上原文出处链接及本声明。
原文链接:https://blog.csdn.net/weixin_48270248/article/details/112600563


